
Smart Loupe
Overview
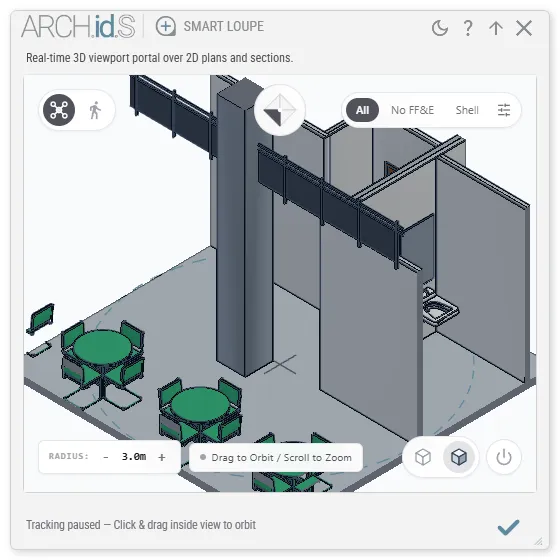
Section titled “Overview”Smart Loupe provides an instant, interactive 3D viewport that hovers directly over your active 2D Revit views (Floor Plans, Reflected Ceiling Plans, Sections, Elevations, and Callouts). Instead of continuously tiling windows, generating temporary 3D views, or drawing disposable Section Boxes to understand complex spatial geometry, Smart Loupe follows your cursor in real time, projecting a clean 3D inspection view of the exact area beneath your mouse.
Smart Loupe extracts model geometry around your cursor on the active level and renders it with crisp architectural linework, solid section cut poché, and zero-friction keyboard controls designed for day-to-day BIM modeling.
Keyboard Shortcuts
Section titled “Keyboard Shortcuts”Smart Loupe features zero-friction keyboard shortcuts that let you control navigation, modes, visual styles, and focal lengths directly while working over your active 2D Revit view:
Core Global Shortcuts
Section titled “Core Global Shortcuts”Shift + Space— Freeze / Resume: Instantly locks the 3D view at the current position and hides the 2D radius circle from Revit’s view so you can model, select, and modify native elements unobstructed. Press again to resume following the cursor.Ctrl + Space— Toggle View Mode: Switches instantly between Axonometric Cutout and Human Walk Perspective.Ctrl + Shift + Space— Toggle Visual Style: Toggles between Hidden Line (pure white architectural linework) and Consistent Colors (Revit category material shading).[— Decrease Radius: Shrinks the inspection radius by 0.5m (down to a minimum of 1.0m).]— Increase Radius: Expands the inspection radius by 0.5m (up to a maximum of 10.0m).
Mode-Specific Shortcuts
Section titled “Mode-Specific Shortcuts”In Axon Mode (Isometric Quadrants)
Section titled “In Axon Mode (Isometric Quadrants)”Shift + Left— South-East (SE): Pivots the isometric view to the SE quadrant (-135° azimuth).Shift + Down— South-West (SW): Pivots the isometric view to the SW quadrant (-45° default architectural isometric).Shift + Right— North-East (NE): Pivots the isometric view to the NE quadrant (135° azimuth).Shift + Up— North-West (NW): Pivots the isometric view to the NW quadrant (45° azimuth).
In Walk Mode (Lens Focal Length Stepping)
Section titled “In Walk Mode (Lens Focal Length Stepping)”Shift + Left— Wider Angle (-1mm): Steps the camera focal length wider by 1mm (down to 14mm ultra-wide).Shift + Right— Tighter Angle (+1mm): Steps the camera focal length tighter by 1mm (up to 70mm telephoto).
Viewing Modes
Section titled “Viewing Modes”Smart Loupe provides two dedicated viewing modes tailored for distinct spatial verification workflows:
1. Axonometric Cutout (Default)
Section titled “1. Axonometric Cutout (Default)”A true architectural isometric projection. This orthographic mode eliminates perspective distortion across the inspection radius, allowing you to visually gauge vertical alignments, ceiling heights, and structural layer stacking.
- Boundary Cutout: Slices walls, floors, and partitions cleanly at the configured radius to isolate the exact zone of interest.
- Automated Ceiling & Roof Hiding: In Axon mode, ceilings and roofs are automatically turned
Offso you have an unobstructed top-down view into the room layouts, furniture arrangements, and internal partition junctions. - Clear Vertical Framing: Framed to give clear visibility from the floor slab up through ceiling height.
- Interactive Orbit & Quadrant Snapping: Click and drag anywhere inside the 3D canvas to rotate freely around the focal center, or use
Shift + Arrow Keysto snap instantly to any of the 4 cardinal isometric quadrants (SW, SE, NE, NW).
2. Human Eye-Level Walk Perspective
Section titled “2. Human Eye-Level Walk Perspective”Places a perspective camera at human eye height (1.6m above the active floor level) directly at your cursor coordinates.
- Steadicam Walk Steering: As you move your mouse across the Revit floor plan, the camera smoothly steers toward your direction of travel. Turning is governed by an architectural steadicam damping engine with a gentle ±32° maximum steering deviation per stride to eliminate disorienting camera whipping.
- Human Stride Gating (70cm Threshold): Hand tremors, desk jitters, and micro-movements under 70cm (~2.3 feet) are automatically filtered out, ensuring the camera gaze stays locked forward until you make a deliberate stride in a new direction.
- Instant Stop-Locking (Zero Post-Stop Easing): The moment you bring your cursor to a stop (after 90 milliseconds of stillness), the camera immediately halts all panning. There is no lingering drift, creeping rotation, or extended easing after your hand rests.
- Automated Overhead Enclosure: Switching to Walk mode automatically reveals Ceilings & Roofs so your first-person perspective feels realistically enclosed inside the room.
- Extended Headroom Clearance: The top clipping plane dynamically expands to
storyHeight + 3.5m, ensuring double-height lobbies, cathedral ceilings, and pitched roof trusses are fully visible without being sliced off. - Look-Around Control: Click and drag inside the viewport while in Walk mode to look around (pan left/right and tilt up/down). Moving the cursor across Revit again re-aligns your heading with the walk trajectory.
3. Section & Elevation Navigation
Section titled “3. Section & Elevation Navigation”When inspecting from a Section or Elevation view:
- Strict Cut-Line Movement: Moving your cursor left or right slides the 3D inspection view strictly along the section cut line.
- Dynamic Level Auto-Detection: Moving your cursor vertically detects the elevation and automatically identifies and latches to the parent Level, updating the status readout and re-anchoring base heights as you cross floors.
- In Walk Mode: The camera points directly into the space behind the cut line (in the section view’s orientation), allowing you to step through and inspect the room depth behind the cut.
Photographic Focal Length Lens Selector
Section titled “Photographic Focal Length Lens Selector”When in Walk mode, clicking the focal length pill in the top-left HUD reveals a specialized lens menu calibrated to 35mm full-frame architectural photography standards:
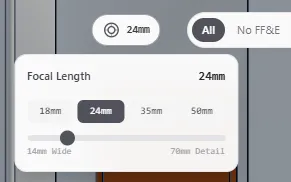
- 14mm Ultra-Wide: Dramatic interior sweeps; ideal for compact powder rooms, elevators, and narrow utility shafts.
- 18mm Super-Wide (Default): Broad room overviews, open-plan lobbies, and wide section cutaways.
- 24mm Architectural Wide: The industry standard for balanced architectural interior photography with natural perspective falloff.
- 35mm Environmental Eye: True-to-life human visual field; excellent for verifying sightlines and signage visibility.
- 50mm Standard: Zero optical distortion; ideal for inspecting vertical joinery alignments and straight-on elevations.
- 70mm Detail Lens: Compressed telephoto field; allows close inspection of distant ceiling bulkheads, curtain wall transoms, or high-level MEP services without moving the cursor.
Interface Breakdown
Section titled “Interface Breakdown”1. Floating HUD & Orientation Diamond
Section titled “1. Floating HUD & Orientation Diamond”- Mode Switcher (Top-Left): Toggle between Axon and Walk perspective. In Walk mode, displays the active focal length with one-click access to the lens menu.
- Orientation Diamond (Top-Center): A floating four-quadrant compass rose displaying the primary axonometric angles:
- SW (South-West): -45° azimuth (Default architectural isometric).
- SE (South-East): -135° azimuth.
- NE (North-East): 135° azimuth.
- NW (North-West): 45° azimuth.
- Click any quadrant sector to pivot the view to that orientation. The compass automatically highlights the closest cardinal sector as you manually orbit.
2. Inspection Radius Controls (Bottom-Left)
Section titled “2. Inspection Radius Controls (Bottom-Left)”- Radius Pill: Displays the current inspection radius in meters (from 1.0m up to 10.0m).
- Micro-Steppers (
-/+): Increment or decrement radius by 0.5m with a click. - Mouse Wheel: Scroll inside the 3D viewport to smoothly expand or contract the inspection boundary.
- 2D Revit Feedback: Changing the radius immediately updates the live dashed circle rendered over your active 2D view.
3. Display Styles & Poché (Bottom-Right)
Section titled “3. Display Styles & Poché (Bottom-Right)”- Hidden Line Mode (Default): Architectural white surfaces paired with crisp edge outlines.
- Consistent Colors Mode: Shaded architectural materials displaying Revit family colors.
- Visual Style Toggle (
Ctrl + Shift + Space): Instantly flip between Hidden Line and Consistent Colors anywhere over your Revit view without moving your mouse to click the HUD. - Section Cut Poché: Cut surfaces through walls, columns, and floors are poched with a solid cap for graphic clarity, matching standard Revit architectural presentation.
- Freeze / Resume Button (
Shift + Space): Pause live tracking to freely orbit the 3D view, or resume cursor following.
4. Visibility Graphics & Category Presets (Top-Right)
Section titled “4. Visibility Graphics & Category Presets (Top-Right)”Smart Loupe reads the Visibility/Graphics overrides of your active 2D view upon launch and provides three instant presets:
- All: Displays all building elements across structural, architectural, and interior disciplines (Ceilings & Roofs default to
Offin Axon mode to keep the interior visible from above, and automatically switchOnin Walk mode). - No FF&E: Instantly hides Furniture, Casework, Specialty Equipment, and Plumbing Fixtures to inspect partition layouts and structural clearances.
- Shell: Isolates core structural elements (Walls, Curtain Walls, Columns, Floors, and Stairs) for envelope review.
Granular Category Selection Flyout
Section titled “Granular Category Selection Flyout”Click the sliders icon next to the presets to expand the granular category menu:
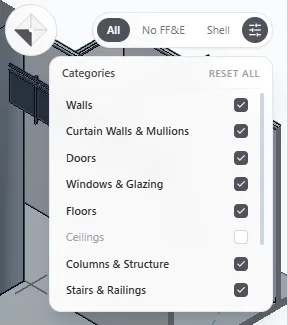
Individually toggle any of the 11 supported BIM building categories:
- Walls (Basic, Stacked, and Curtain)
- Curtain Walls & Mullions
- Doors
- Windows & Glazing
- Floors & Slabs
- Ceilings & Roofs (including Roof Soffits and Fascias)
- Columns & Structural Columns
- Stairs & Railings
- Furniture & Casework (including Generic Models)
- Specialty & MEP Equipment
- Plumbing Fixtures
- Reset All: Restores all categories to their default visible state with one click.
5. Window Positioning, Theme & Memory
Section titled “5. Window Positioning, Theme & Memory”- Smart Revit Window Centering: On initial launch, Smart Loupe automatically queries your parent Revit window dimensions and centers itself right over the primary modeling viewport.
- Session Memory Persistence: Window screen coordinates (
Left,Top), dimensions (Width,Height), inspection radius, active mode (Axon/Walk), and visual style are saved to%AppData%\ARCHids\SmartLoupe\window_settings.jsonand restored seamlessly on your next session. - Titlebar Theme Synchronization: Smart Loupe natively syncs with the ARCHids platform titlebar Theme setting (Light Mode default / Dark Mode). Switching themes instantly updates the 3D viewport background, 3D reticle linework, HUD frosted glass panels, and section poché tones.
- Proximity Standby Mode: When your cursor moves into empty space outside the building model footprint, the 3D viewport enters standby mode, cleanly clearing the canvas to your theme background with a frosted status pill (“Move cursor over building to inspect”), saving GPU processing.
- Status Readout (Footer): Real-time spatial identification reporting the active Revit View name, current Level elevation, and enclosing Room name (
Live: Level 1 | Café 101). When tracking is paused, indicates orbit instructions. - 1:1 Proportional Resize Grip (Bottom-Right Corner): Drag the diagonal resize thumb to proportionally scale the tool window while maintaining a square viewport aspect ratio.
💡 Architect’s Tips
Section titled “💡 Architect’s Tips”- Rapid 4-Quadrant Isometric Review (
Shift + Arrow Keys): Inspecting a complex column-beam junction or structural corner? TapShift + Left,Shift + Down,Shift + Right, andShift + Upto cycle around all 4 isometric perspectives in seconds without touching the mouse. - Instant Linework vs. Material Toggle (
Ctrl + Shift + Space): Use Hidden Line mode to inspect geometric alignments and wall contact seams, then tapCtrl + Shift + Spaceto immediately reveal family material colors and verify finish designations. - Fine-Tune Walkway Perspectives (
Shift + Left / Right): While walking down a tight corridor in Walk mode, tapShift + Leftto step the lens wider by 1mm at a time, finding the exact optical balance between spatial depth and corner distortion. - Verify Door Swings & FF&E Clearances: Use the
[and]bracket shortcuts to dial the radius down to 1.5m around tight door openings. Switch between All and No FF&E to instantly verify whether open door leafs collide with nearby casework, electrical panels, or plumbing fixtures. - Unobstructed Modeling (
Shift + Space): When you identify an alignment issue in the 3D view, hitShift + Spaceto freeze tracking. The 2D circle disappears completely from Revit’s canvas, allowing you to use native Revit tools (ALAlign,MVMove,TRTrim) with full clarity while keeping the 3D reference locked on screen. Once adjusted, hitShift + Spaceagain to resume tracking. - Curtain Wall Detail Review: In Walk mode, toggle to the 70mm Detail Lens while standing at the perimeter of a curtain wall. The telephoto perspective lets you inspect mullion capping profiles and transom connections across the structural bay without perspective distortion.