
Smart Array
Overview
Section titled “Overview”The Smart Array tool overcomes the persistent limitations of Revit’s native linear and radial array commands, empowering architects and engineers to quickly populate elements across complex, multi-segment, and compound curved trajectories. It fluidly supports both standalone architectural Families and pre-configured Revit Groups, scaling from simple linear spacing distributions up to sophisticated 3D volumetric matrix installations.
Crucially, the tool packages every completed array into an intelligent Revit Group embedded with extensible configuration data. This ensures your arrays remain completely flexible: you can jump into Edit Mode at any point throughout design development to adjust spacing rules, swap element families, or inject aisle gaps without ever needing to redraw your base pathways!
Unified Ribbon & Editing Workflow
Section titled “Unified Ribbon & Editing Workflow”To keep your design workspace focused, all creation and revision functionality has been consolidated into a single, uncluttered command on your ribbon.
At the bottom of the tool window, a simple “Edit Array(s)” toggle lets you shift between creation and modification workflows instantly without leaving the interface:
- Create Mode (Default): Pick lines or wall faces to deploy fresh array groups across your project.
- Edit Mode: Activate to modify any previously placed Smart Array Group in your model. Hovering over the footer toggle displays real-time status guidance in the notification bar (
"Select existing array group(s) for parameter and layout edits"). Once an array is loaded, tweak your spacing numbers or rules and simply click Update Array, or switch straight to modifying another layout in your view using Pick Next.
Interface Breakdown
Section titled “Interface Breakdown”1. Element & Path Configuration
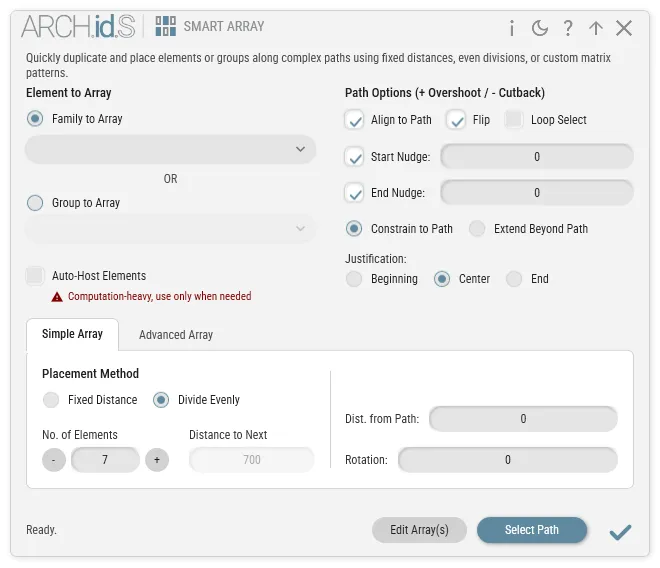
Section titled “1. Element & Path Configuration”- Element to Array: Choose whether to duplicate a standalone Family or an entire Group. Searchable drop-down filters dynamically scan and populate with every available building asset currently loaded in your project.
- Path & Orientation Controls:
- Align to Path: Automatically rotates placed elements to mirror the evolving tangent curvature of your path as they travel along it.
- Flip Direction / Loop Select: Reverse overall array propagation direction instantly, or activate Loop Select to automatically trace and link touching model curves together with a single click.
- Nudging (Overshoot & Cutback): Apply precise structural offsets at path extremities. Enter positive or negative values to push elements outward or hold them safely back—essential for ensuring desk runs or seating installations respect required fire clearances against end walls!
- Constraint & Justification Rules: Decide whether element counts terminate strictly at your physical path boundaries or project continuously onward along the vector trajectory. You can also justify remaining structural tolerances evenly to the Beginning, Center, or End of your span.
- Auto-Host Elements: Automatically projects elements downward via ray-casting to identify and attach to structural floors, topological surfaces, or site pads below. This guarantees outdoor installations always land flush against sloped site landscape contours! (Tip: Use judiciously on massive multi-thousand element runs, as volumetric 3D ray-casting is computationally intensive).
2. Simple Array
Section titled “2. Simple Array”The quickest method for standard linear spacing distributions along a trajectory:
- Placement Method: Toggle between Divide Evenly to fit a definitive total count across the line segment, or Fixed Distance to enforce exact structural measurement tolerances between individual element placements.
- No. of Elements / Distance to Next: Configure core numeric spacing constraints corresponding to your chosen layout methodology.
- Path Offset & Global Rotation: Apply an overall perpendicular offset shift away from your drawing baseline, or enforce a global rotational override applied identically across every distributed element.
3. Advanced Array Suite
Section titled “3. Advanced Array Suite”When detailing sophisticated architectural arrangements, switch over to the Advanced tab to unlock three professional matrix engines:
Custom Pattern Sequence
Section titled “Custom Pattern Sequence”Build intricate, multi-step structural rhythms perfectly matching specialized façade or landscape design logic.
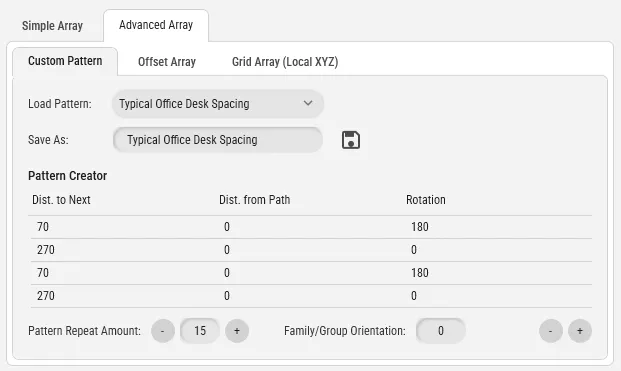
- Load Pattern / Save As: Manage and swap out established architectural sequence presets. Saved configuration files persist globally for seamless redeployment across all your office projects.
- Pattern Creator (Step Grid): Build bespoke sequential rhythms using simple
+and-row controllers. Each row defines an independent step along the path utilizing three metrics:- Dist. to Next: The exact measurement to travel forward along the path after placing this specific item before dropping the next step.
- Path Offset: A unique localized perpendicular shift away from the baseline path specific to this row’s element.
- Rotation: A distinct rotational override applied strictly to this individual step in the sequence.
- Pattern Repeat Amount: Defines how many complete cycles the sequence defined inside your Step Grid will repeat down the trajectory.
Offset Array & Aisle Generation
Section titled “Offset Array & Aisle Generation”Array elements linearly along your path while simultaneously cloning entire assemblies outward into parallel multi-row configurations.
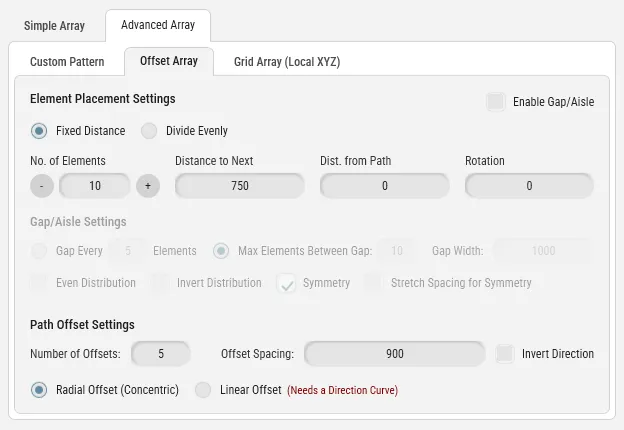
- Element Placement Settings: Configures base spacing tolerances along your initial baseline trajectory identically to the Simple Array tab. Use the Enable Gap/Aisle Settings toggle to globally turn automated aisle separation ON or OFF.
- Gap/Aisle Settings: A powerful spatial layout engine capable of automatically weaving walking aisles, fire-breaks, or structural separation corridors straight through your array—an absolute lifesaver when drafting auditorium seating or complex parking installations!
- Gap Every vs. Max Elements: Enforce hard interval rules (such as
"Gap Every 10 Elements") or allow the algorithm to dynamically optimize layout blocks by defining a maximum permissible grouping threshold. - Gap Width: Establish the precise structural measurement of the walking corridor or aisle clearance.
- Distribution & Symmetry Controls: Refine visual balance across remaining tolerances using Even Distribution, reverse left-to-right remainders via Invert Distribution, or establish flawless mirrored layouts utilizing Symmetry.
- Stretch Spacing for Symmetry: When Symmetry is engaged, activating this intelligent tolerance toggle gently flexes individual item spacing to guarantee a mathematically perfect mirrored installation without awkward, chopped-off remainders at edge margins!
- Gap Every vs. Max Elements: Enforce hard interval rules (such as
- Multi-Row Offset Settings:
- Number of Offsets / Spacing: Defines total parallel rows to generate outward and the structural distance separating each concentric line.
- Invert Direction: A rapid toggle to flip row expansion outward toward the opposite side of your path without forcing you to retype negative numbers.
- Radial Offset (Concentric): Expands row arrays outward as sweeping, concentric curved arcs (ideal for stadium amphitheaters) perfectly mirroring the underlying geometry of your curving path.
- Linear Offset: Overrides radial projection, sliding multi-row arrays rigidly along a linear trajectory vector. (Note: Linear mode prompts you to pick a secondary “Direction Curve” in your 3D model after clicking your baseline path).
Grid Array (Volumetric Local XYZ)
Section titled “Grid Array (Volumetric Local XYZ)”A powerful 3D structural matrix generator. It treats your path starting point as a localized coordinate origin and arrays outward across spatial dimensions.
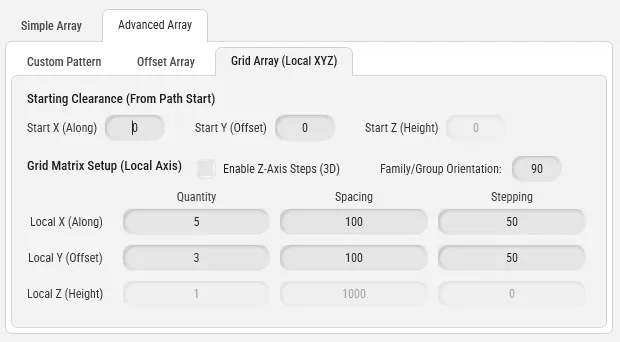
- Starting Clearance (From Path Origin): Shift the starting origin away from your initial click target by entering explicit Start X (Along Path), Start Y (Perpendicular), and Start Z (Elevation) clearance values.
- Enable Z-Axis Steps (3D Volumetric): Unlocks vertical Z-axis inputs for multi-story volumetric duplication arrays. (Tip: Use care when arraying face-hosted families into open space without engaging Auto-Host).
- Grid Matrix Setup: Configures comprehensive expansion rules across Local X, Y, and Z axes utilizing three parameters per axis:
- Quantity: Total element volume to generate down that specific dimensional axis.
- Spacing: Primary architectural clearance distance between elements along the vector.
- Stepping (Stagger): A sequential offset shift applied progressively as the array expands—effortlessly generating cascading diagonal grids, sloped terraces, or stepped stadium bleachers!
4. Action Bar Commands
Section titled “4. Action Bar Commands”- Select Path: Click to enter Revit’s active viewport selection mode and pick the model curves or walls you wish to array along.
- Edit Array Operations: When the bottom Edit Array(s) toggle is checked and you select an existing Smart Array in your project, the action button transitions to Update Array. Modifying any parameter in the window and clicking Update instantly re-evaluates and redraws the Revit Group to match your new specifications!
💡 Architect’s Tips & Behavior Guide
Section titled “💡 Architect’s Tips & Behavior Guide”- Ghost Path Intelligence: Because Smart Array writes trajectory data directly into the created Revit Group’s extensible memory, you don’t have to preserve cluttering reference lines in your working views! You can safely delete your original reference lines; the group remembers its underlying trajectory whenever you re-enter Edit Mode later.
- Direct Wall Face Hosting: The path selection filter doesn’t just look for simple model lines—it actively identifies and binds to wall edges and faces! This workflow is exceptional for distributing decorative sconces, acoustical wall panels, or facade structural louvers directly along curving architectural surfaces.
- Z-Axis & Face-Hosted Fallbacks: When using the 3D Grid Array engine to vertically stack face-hosted elements in empty space, Revit will typically report placement errors. Simply check Auto-Host Elements; the tool will dynamically fire vertical ray-casts downward to bind every matrix element safely to the nearest structural floor or site topography below!
- Rapid Micro-Stepping Controls: Take advantage of the small
+and-stepper buttons located next to quantity boxes to quickly increment or decrement your total array counts without taking your hand off the mouse to type on the keyboard.
🌟 Real-World Architectural Workflows
Section titled “🌟 Real-World Architectural Workflows”- Auditorium & Theater Seating: Engage Grid Array in Radial Offset (Concentric) mode combined with Gap/Aisle Settings. You can lay out sweeping, beautifully curved acoustic amphitheaters integrated with strictly verified egress aisles in just two mouse clicks!
- Curvilinear Parking Lots: Sketch a continuous guideline spline down the spine of an organic landscape site plan. Use Offset Array configured with Invert Direction and Symmetry to instantly draft pristine, mirrored parking bay configurations flowing effortlessly along curving site geometry.
- Topographic Site Fencing & Barriers: Eliminate the tedium of manually altering individual base offsets across sloped outdoor terrain. Array your fencing panels along a property boundary curve and check Auto-Host Elements—each fence panel will automatically adjust its elevation to hug rolling topography perfectly.
- Angled Facade Louver Systems: When managing diagonal architectural building grids, activate the Linear Offset toggle. Array your sunshades down your initial baseline, then click a secondary diagonal window mullion line to force the entire multi-row array to slide rigidly up your facade grid angle!
- Vehicle Swept-Path Analysis: Select a standard 2D or 3D vehicle family and array it along a complex driving spline utilizing Align to Path. This creates an instant visual tracking animation representing vehicle turn radiuses and cornering clearances—perfect for validating parking garage ramps, tight delivery docks, and emergency fire-lane turning radii!