
Smart Paint
Overview
Section titled “Overview”The Smart Paint tool completely revolutionizes Revit’s cumbersome native painting workflow. Instead of forced 3D navigation—orbiting around cramped interior models to painstakingly click endless individual wall faces—Smart Paint empowers designers to paint the complete internal boundaries of an entire room with a single click! Crucially, paints can be applied directly inside standard 2D Floor Plans and Elevation views, overcoming a notorious, long-standing limitation of native Revit software.
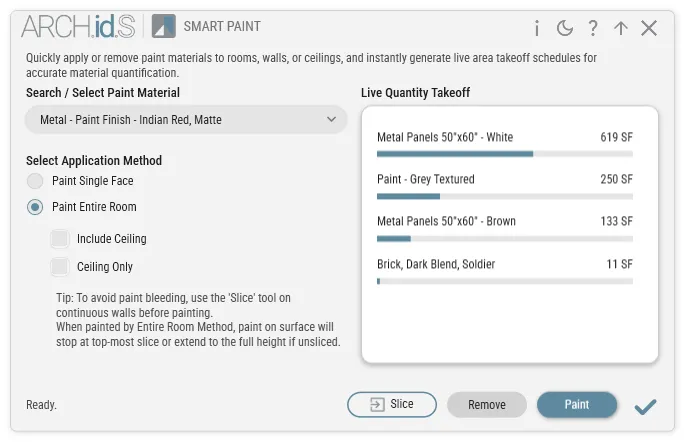
Engineered to operate in seamless harmony with Smart Slice, it empowers interior designers to effortlessly model complex, multi-tone wainscoting and layered material banding. Furthermore, Smart Paint includes a live, interactive quantity dashboard that calculates exact painted surface areas across your model in real time, making rapid architectural material take-offs and budgeting effortless during design development.
Interface Breakdown
Section titled “Interface Breakdown”1. Material Selection Palette
Section titled “1. Material Selection Palette”- Search / Select Material: An instantaneous, searchable drop-down interface populated automatically with every architectural material and finish currently loaded inside your Revit project database.
2. Intelligent Painting Modes
Section titled “2. Intelligent Painting Modes”Choose the exact scope and application behavior for deploying your selected finishes:
- Room Mode (All Interior Boundaries): The absolute fastest workflow for interior architecture. Click inside any valid Revit Room, and the tool simultaneously identifies, tests, and paints every bounding internal wall face enclosing that space in milliseconds!
- Include Ceiling: Activate this secondary option to paint the overhead room ceiling plane concurrently with your enclosing wall faces.
- Ceiling Only: Isolates paint application strictly to the ceiling surface above your target room while leaving wall boundaries untouched—the ultimate productivity booster when working across complex Reflected Ceiling Plans (RCPs)!
- Face Mode (Surgical Precision): Operates similarly to standard face-painting tools but augmented with enhanced structural filtering. Easily target and paint specific isolated wall sections, structural columns, ceilings, or exposed flooring planes without dealing with clunky cursor blocking or awkward selection hopping.
3. Live Material Take-Off Dashboard
Section titled “3. Live Material Take-Off Dashboard”As you paint (or remove finishes) across your project, this powerful monitoring panel continuously dynamically recalculates and reports live surface statistics:
- Material / Area / % Breakdown: Presents an itemized breakdown of every applied material name, displays true physical surface area totals matching your project’s configured display units, and computes percentage share distributions across your building model. This provides instant verification for painter subcontractor estimation packages and interior budgeting!
4. Action Bar & Smart Slice Integration
Section titled “4. Action Bar & Smart Slice Integration”- Paint / Remove: Instantly toggle between application and stripping workflows. Engaging Remove while working in Room Mode allows you to completely strip painted finishes off an entire room’s bounding perimeter in a single mouse click!
- Slice (Quick-Switch to Smart Slice): A dedicated companion shortcut. When designing two-tone split paint schemes, chair rail transitions, or decorative tile dados, click this button to instantly suspend Smart Paint and open Smart Slice to subdivide your wall faces. Once your panels are cleanly sliced, switch effortlessly back to Smart Paint to assign finishes to your newly created zones!
💡 Architect’s Tips & Behavior Guide
Section titled “💡 Architect’s Tips & Behavior Guide”- The Ultimate Studio Workflow (Slice & Paint): When designing hospitality restrooms, corridors, or feature lobbies, start by utilizing Smart Slice to draw a clean horizontal line across your walls at 1200mm. Next, click the Paint shortcut button to jump into Smart Paint (in Face Mode) and drop an impervious porcelain tile finish strictly along the lower 1200mm dado band, leaving upper gypsum board walls perfectly untouched!
- Liberation from 3D View Restraints: Stop wrestling with section boxes just to paint a tiny utility closet in 3D! Because Smart Paint operates flawlessly inside standard 2D architectural Floor Plans, you can effortlessly step through commercial office floor layouts applying consistent color schemes and material specifications room-by-room in record time.
- Protected & Precise Removal: The paint stripping function is structurally safeguarded. Using Remove in Room Mode intelligently confines paint removal strictly to the internal room-facing surfaces of your selected space—never accidentally bleeding over into adjacent corridors or exterior wall faces on the other side of your partitions.
- Graceful Category Handling: If a customized Revit component or placed equipment family stubbornly declines paint application, it is typically because its core Revit category natively disallows face-painting in the software kernel. Smart Paint politely identifies and passes over these rigid structural entities without throwing disruptive errors or crashing your modeling session.