
Finish Pattern Set-Out
Overview
Section titled “Overview”The Finish Pattern Set-Out tool bridges the gap between decorative surface detailing and precise construction quantity surveying. Instead of wrestling with custom .pat hatch files or importing static 2D AutoCAD linework to depict complex ceramic tiling, brickwork, or site paving, this tool generates fully adaptable, parametric surface patterns projected directly onto any flat architectural plane—including floors, interior feature walls, ceilings, and sloped roofs.
Beyond simply drafting crisp presentation lines, the engine acts as an integrated automated quantity surveyor. It dynamically analyzes your finished layouts, factors in specified grout joint dimensions, accounts for edge-cut wastage percentages, and automatically compiles verified Bill of Quantities schedules grouped room-by-room for contractor tender packages.
Interface Breakdown
Section titled “Interface Breakdown”1. Pattern Selection & Dimensions
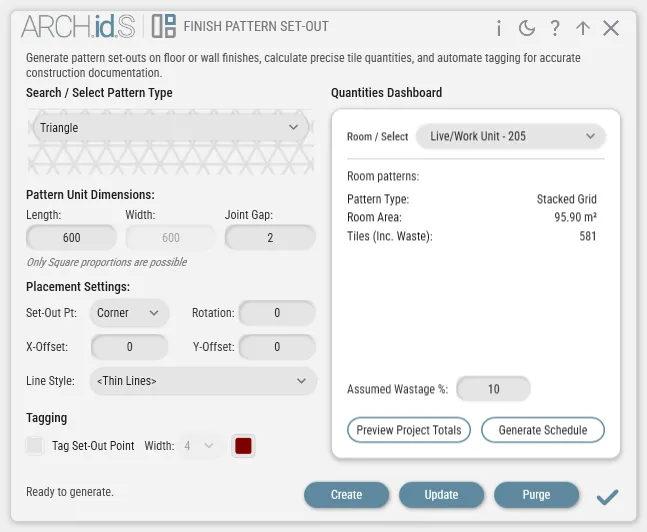
Section titled “1. Pattern Selection & Dimensions”- Search / Select Pattern Type: Explore a rich library of built-in parametric surface configurations tailored to standard structural and decorative materials.
Standard Assemblies
Section titled “Standard Assemblies”Stacked Grid
Running Bond
Offset Bond
Herringbone
Triangle
Chevron
Basketweave
Windmill
Decorative Interior Layouts
Section titled “Decorative Interior Layouts”Hexagon
Octagon & Dot
Cairo Pentagon
Picket
Fish Scale
Hopscotch
Masonry & Stone Paving
Section titled “Masonry & Stone Paving”French Pattern
English Bond
Random Ashlar
Acoustic & Decorative Perforations
Section titled “Acoustic & Decorative Perforations”Perf Grid
Perf Hexagon
Perf Diamond
Perf Circle
- Length & Width: Specify the precise manufactured measurements of your base tile or paving unit.
- Intelligent Aspect Constraints: To protect design intent, the tool locks the Width input for geometry patterns that strictly require equilateral proportions (such as Hexagons, Triangles, or the French Pattern). Likewise, it actively warns you if you input square proportions into rectangular bond layouts like Herringbone.
- Joint Gap: Define your grout line or mortar joint thickness. The mathematical engine natively incorporates this joint separation into both visual drafting runs and net unit quantity totals!
- Stagger & Aspect Ratio: Fine-tune alternating pattern shift increments and geometry proportions for supported arrangements like Offset Bond or Picket.
- Spacing (Perforation Controls): Establishes the exact center-to-center frequency between panel cutouts in Perforation modes.
- Overlap Protection: The calculation engine actively prevents entering spacing values narrower than unit dimensions, guaranteeing acoustic cutouts never blend or cross over!
2. Alignment & Placement Tuning
Section titled “2. Alignment & Placement Tuning”- Set-Out Pt (Alignment): Toggle whether your origin click aligns to the outer intersection Corner of a tile or anchors cleanly to the exact geometric Center of a master tile unit.
- Rotation: Orient the entire pattern grid relative to your building axis or architectural layout angles.
- X-Offset / Y-Offset: Nudge your starting origin point across horizontal or vertical axes to balance cut tile sizes along room borders and wall perimeters.
- Line Style: Assign the precise Revit drawing line subcategory utilized to draft the pattern run (defaulting cleanly to
<Thin Lines>).
3. Contractor Site Tagging & Markers
Section titled “3. Contractor Site Tagging & Markers”- Tag Set-Out Point: Check this box to deploy a clear 2D crosshair alignment marker directly over your precise starting origin click. This offers unmistakable visual instruction for site tile-setters and general contractors regarding where to start laying out tiles!
- Marker Appearance: Customize graphic visibility by choosing specific Line Weights (1–16) and custom colors so origin crosshairs stand out unmistakably on busy architectural sheets and black-and-white print layouts.
4. Live Quantities & BOQ Dashboard
Section titled “4. Live Quantities & BOQ Dashboard”-
Room / Select (Searchable): As patterns deploy across your model, the engine automatically maps each surface back to its native enclosing Revit Room. Use this dropdown to perform immediate room-by-room tiling audits.
-
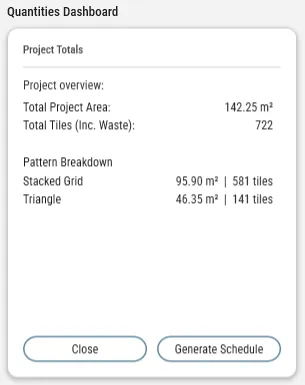
Project Totals Toggle: Hit Preview Project Totals to expand the dashboard into a macroscopic audit covering every square meter of tiling required across your entire project, sorted cleanly by pattern assembly style.
-
Assumed Wastage %: Input an expected site waste margin (such as 10% for diagonal layouts or tricky cut perimeters). The dashboard dynamically generates a total order count by summing net unit consumption with your wastage allowance and rounding up to whole manufactured units.
-
Generate Schedule: With a simple click, the tool injects standardized Shared Parameters into your project and constructs a professional, pre-formatted Revit View Schedule organizing material take-offs by Level and Room!

5. Action Bar Management
Section titled “5. Action Bar Management”- Create: Prompts you to pick a flat architectural face in your model and then click once to define the starting origin set-out point.
- Update: Select an existing pattern line in your plan to instantly replace the entire layout grid with your adjusted dimensions and tile settings without creating duplicates.
- Purge: Select any completed layout line to permanently strip the entire pattern grid and clear its associated BIM quantity tracking data from the space.
💡 Architect’s Tips & Behavior Guide
Section titled “💡 Architect’s Tips & Behavior Guide”- The Cookie-Cutter Engine: Don’t stress over complex, curving room shapes, floor penetrations, or structural plumbing chases! Simply select the target surface: our layout engine trims pattern lines cleanly against your floor or wall perimeter, automatically avoiding internal voids and floor drains.
- Herringbone 45° Alignment: Because classic Herringbone layouts incorporate a native 45-degree geometric angle, leaving your rotation input set to
0°naturally results in a diagonal tile sweep across your room axes. To run Herringbone square to your walls, simply input a45°rotation override! - Zero-Math Contractor Coordination: Stop fielding RFIs from contractors about where to begin laying tiles in lobby spaces. Place an explicit Set-Out Marker at your main doorway threshold or room center to ensure symmetry across public high-visibility zones.
- Interactive Step-by-Step Guidance: Keep an eye on the bottom-left notification bar of the tool dialog! It displays helpful, multi-step instructions during selection operations (e.g., “Select a flat surface…”, “Pick a set-out point…”) to make layout placement foolproof.