
Smart Trim
Overview
Section titled “Overview”The Smart Trim tool is a 3-in-1 architectural detailing engine designed by architects, for architects. Whether you need to run skirting boards along a tiled lobby, chair-rails across a corridor, or crown molding (cornices) around high ceiling perimeters, Smart Trim automates the entire process in seconds.
Instead of manually drafting sweep paths segment-by-segment and calculating doorway subtraction math, Smart Trim intelligently traces complete room boundaries or specific wall faces. Powered by a real-world 3D Boolean geometry engine, it automatically evaluates the physical solids of intersecting architectural elements—flawlessly cutting around doors, windows, curtain wall mullions, built-in casework, and MEP equipment.
To keep your models flexible throughout design revisions, Smart Trim combines initial placement and post-placement modifications into a single unified interface. With a quick toggle, you can transition between applying fresh trims and executing project-wide global updates or precise local geometric adjustments. Furthermore, it serves as an automated BIM data manager, calculating exact lengths and injecting Room Name and Room Number directly into every trim instance for instantaneous scheduling.
Unified Create & Edit Workflow
Section titled “Unified Create & Edit Workflow”To streamline your modeling environment, Smart Trim has consolidated all creation and revision tools into a single, uncluttered command on your ribbon.
At the bottom of the tool window, an “Edit Trim(s)” toggle allows you to fluidly switch between two distinct states without ever leaving your workflow:
- Create Mode (Default): Ready to generate fresh sweeps across entire rooms or isolated surfaces.
- Edit Mode: Unlocks a dual-action modification suite for adjusting previously placed trims in your project. Hovering over the toggle displays helpful status tips directly in the bottom bar, guiding your selections in real-time.
The Edit Mode Suite: Global vs. Targeted Edits
Section titled “The Edit Mode Suite: Global vs. Targeted Edits”When making design modifications in an active project, you rarely want to change everything at once. Smart Trim cleverly separates styling changes from localized geometry tweaks when you enter Edit Mode:
🌟 Global Edit (Project-Wide Standards)
Section titled “🌟 Global Edit (Project-Wide Standards)”When switched to Global Edit, updating any core profile or parameter setting automatically pushes your changes across all matching trim instances in your project simultaneously. This is essential for design development revisions:
- Switch Profiles: Replace a 100mm minimalist baseboard with a 150mm shadow-line profile across fifty rooms in a single click.
- Update Heights & Alignments: Quickly tweak vertical placement offsets or flip top/bottom alignment rules.
- Assign Materials & BIM Data: Update finish materials or inject revised scheduling Keynotes and specifications across all identical trims project-wide without hunting them down in view.
🎯 Targeted Edit (Localized Detailing)
Section titled “🎯 Targeted Edit (Localized Detailing)”When set to Targeted Edit, changes are strictly locked to the individual trim instances you select in your view, preserving your global project standards:
- Custom Cutbacks & Wall Offsets: Hold trim back an extra few millimeters around an irregular custom architectural feature without breaking typical doorway clearances elsewhere.
- Toggle Corner Radiuses & Wall Returns: Smooth out specific sharp walkways or add 90-degree returned end-caps strictly where trims terminate at open structural edges.
Interface Breakdown
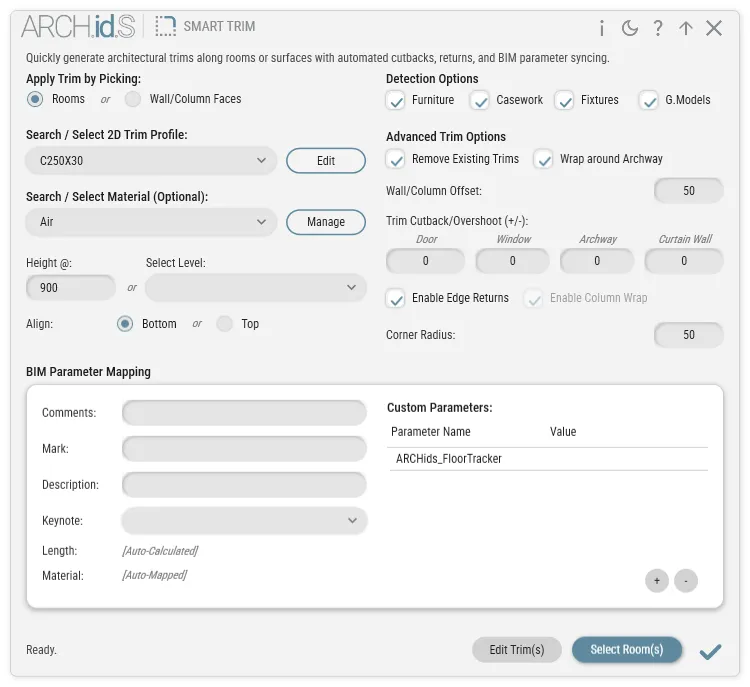
Section titled “Interface Breakdown”1. Profile & Level Setup
Section titled “1. Profile & Level Setup”- Trim Profile: Select any standard 2D Profile Family currently loaded in your project.
- Edit Family Shortcut: Click the small shortcut button next to the dropdown to instantly open your selected 2D profile in Revit’s Family Editor, allowing you to fine-tune dimensions on the fly.
- Base Level: Establish the primary datum level hosting the trim geometry.
2. Geometry & Offsets
Section titled “2. Geometry & Offsets”- Height Offset: Shift the trim vertically from the Base Level (e.g., set to
0for skirting,900for wall chair-rails, or2700for ceiling cornices). - Align Top: By default, the bottom edge of your profile rests on the height offset line. Check Align Top to lock the top edge instead—this removes all mathematical guesswork when placing cornices directly against finished ceiling heights.
- Wall Offset: Push the trim away from (or embed it into) the wall surface.
- Trim Cutback: Define a protective physical setback distance to hold trims cleanly away from the rough edges of door openings, window frames, or terminating wall ends.
3. Advanced Architectural Detailing
Section titled “3. Advanced Architectural Detailing”- Corner Radius: Automatically fillet sharp 90-degree internal or external wall corners with a smooth curved arc. (Note: Smart Trim automatically protects against geometry inversion by disabling radiuses on micro-segments).
- Enable Wall Returns: When using a Wall Offset that pushes trim outward, checking this option automatically models elegant 90-degree returned end-caps that route the trim back flush into the wall surface at open terminations.
- Wrap Wall Openings: Forces trims to seamlessly fold into and wrap around architectural cased openings, pass-throughs, or simple wall voids.
- Wrap Columns: Automatically senses architectural or freestanding structural columns intersecting the perimeter and traces trim cleanly around all exposed column faces.
- Equipment Detours: Automatically reads fixed Furniture, Casework cabinetry, and Specialty Equipment (including Mechanical, Electrical, and Plumbing fixtures) backed against walls, stopping the trim perfectly at their physical boundaries so skirtings never clip through cabinets!
4. BIM Parameter Mapping & Materials
Section titled “4. BIM Parameter Mapping & Materials”A centralized data hub that embeds critical scheduling specifications directly into your geometry during placement or editing:
- Material Selection: Pick an exact material finish for the generated sweep. A dedicated shortcut button instantly fires up Revit’s native Material Browser for quick adjustments.
- Standard Parameters: Write standard BIM text directly into native
Comments,Mark,Description, andKeynotefields. - Custom Parameter Matrix: Build out project-specific attributes (e.g., “Manufacturer”, “Paint Coat”, “Sub-contractor”). If a custom parameter doesn’t exist in your project, Smart Trim generates it automatically as a Shared Parameter on the fly!
- Auto-Calculated Room Data: Automated Intelligence! Smart Trim calculates the true swept
Lengthof every line-based model and injects the hostingRoom NameandRoom Numberdirectly into the element’s instance properties.
5. Action Bar & Placement Modes
Section titled “5. Action Bar & Placement Modes”- Remove Existing: Check this box to automatically purge old Smart Trim models from the target space before generating new ones—guaranteeing clean replacements with zero duplicate volume clashing or double-counting in schedules.
- Room Mode vs. Face Mode:
- Leave Face Mode unchecked (Room Mode) to click any interior space in plan or 3D, detailing the entire continuous room perimeter simultaneously.
- Check Face Mode to selectively detail individual wall surfaces, architectural parts, or standalone structural elements with surgical precision.
💡 Architect’s Tips & Behavior Guide
Section titled “💡 Architect’s Tips & Behavior Guide”- Real-World 3D Solid Intersections: Unlike simple scripts that rely on error-prone 2D bounding boxes, Smart Trim extracts the real physical 3D Solid geometry of intersecting doors and windows to execute exact Boolean subtraction cuts. This ensures zero unwanted gaps, even around complex, slanted, or asymmetrical window frames.
- Multi-Loop & Kitchen Island Intelligence: Modern architecture isn’t just empty squares! Utilizing real-world geometric spatial sampling (
IsPointInRoom), Smart Trim automatically handles multi-loop spaces. If a room features a central elevator core, interior columns, or an island kitchen wall, the tool generates clean trim loops around both the outer room boundaries and the internal island structures simultaneously! - Self-Healing Collinear Geometry: Revit frequently divides wall faces into tiny fractured surface segments (such as when utilizing Split Face or joining intersecting interior partitions). Smart Trim features a built-in Collinear Merging engine that seamlessly welds parallel, touching wall fragments back together into clean, continuous sweeping runs.
- Curtain Wall Mullion Sensing: The engine intelligently differentiates between flat glass curtain panels and physical structural mullions. Trims will smoothly sweep directly across glass panels (such as structural glazed partitions or bath enclosures) while cutting back perfectly flush against aluminum structural mullions!
- Instant 2D to 3D Conversion: Stop wasting hours modeling complex, rigid parametric 3D families! Smart Trim takes any lightweight standard 2D Profile Family, generates a robust 3D Line-Based Generic Model behind the scenes, and handles all sweep path transitions automatically.
- Full 3D View Freedom: You don’t have to be restricted to flat floor plans! Smart Trim functions flawlessly inside live 3D views, making it effortless to orbit your interior design models, select visual target walls, and inspect complex corner trim detailing in real time.
- Zero-Math Schedules & BOQ Creation: Because every trim automatically captures accurate linear measurements along with its hosting room’s identification text, producing a complete, reliable Bill of Quantities or room-by-room trim finish schedule takes only seconds using standard Revit schedule formatting.