
Smart Floor Finish
Overview
Section titled “Overview”The Smart Floor Finish tool solves one of Revit’s most persistent architectural modeling flaws: when generating floors from standard room boundaries, the floor slab stops abruptly at the interior wall face, leaving ugly structural floor voids underneath closed door swings and architectural openings!
With a single click, Smart Floor Finish models a dedicated finish floor layer molded perfectly to your room’s internal footprint, while an advanced 3D Boolean solid geometry engine actively reaches through doorways and archways to eliminate structural gaps. You can effortlessly extend the primary floor finish straight through openings or deploy dedicated, independent architectural threshold transitions (such as marble saddles, brass Schluter strips, or hardwood reducers) underneath doors. Furthermore, it operates as a sophisticated BIM data hub, embedding custom parameters directly into your finishes to automate accurate floor scheduling.
Interface Breakdown
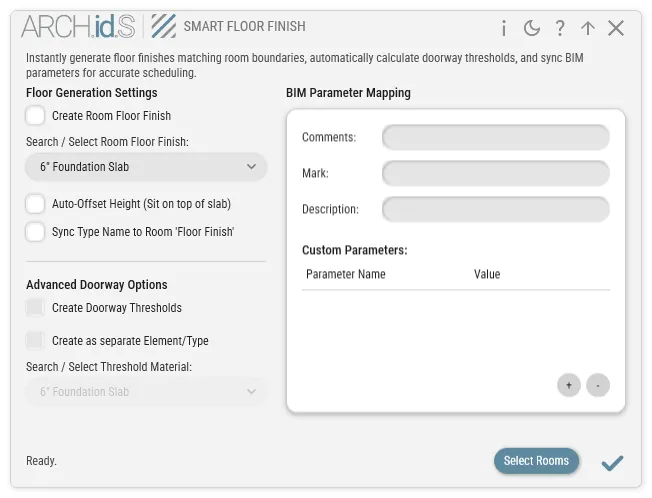
Section titled “Interface Breakdown”1. Floor Generation Settings
Section titled “1. Floor Generation Settings”- Create Room Floor Finish: The primary activation switch commanding the tool to trace and populate the active room boundary.
- Search / Select Room Floor Finish: A fast, searchable drop-down filter populated automatically with every native Revit Floor Type loaded in your project.
- Auto-Offset Height (Sit on Top of Slab): When enabled, the tool evaluates the true physical structural assembly thickness of your chosen Floor Type and automatically shifts its placement elevation upwards. This guarantees your decorative floor finish rests cleanly on top of your rough concrete slab level rather than colliding or burying into it!
- Sync Type Name to Room ‘Floor Finish’: Automatically copies your selected Floor Type’s parameter name and writes it straight into the hosting Room’s native
"Floor Finish"property—keeping your architectural Room Schedules permanently aligned with your 3D geometry.
2. Advanced Doorway Threshold Engine
Section titled “2. Advanced Doorway Threshold Engine”Because interior doors sit centered inside wall substrates, traditional room outlines fail to reach under door leaves. This dedicated suite closes the gap automatically:
- Create Doorway Thresholds: Commands the spatial engine to detect every door frame and open architectural void along the room perimeter, automatically extending the floor slab into the opening footprint.
- Create as Separate Element/Type: By default, threshold extensions project out as a continuous part of your main room floor. Checking this box decouples the doorway footprint into an independent floor element—enabling you to assign a completely different material Floor Type (like an impervious stone saddle or decorative brass transition strip) specifically under door leaves!
3. BIM Parameter Mapping Hub
Section titled “3. BIM Parameter Mapping Hub”A centralized specification dashboard that infuses custom scheduling data straight into your generated floor slabs during placement:
- Standard Parameters: Directly populate standard Revit text fields including
Comments,Mark, andDescription. - Custom Parameters Matrix: Establish project-specific attributes (e.g., “Manufacturer”, “Slip Resistance Classification”, “Acoustic Underlayment”).
- Automated Shared Parameter Creation: If a custom parameter name doesn’t currently exist in your project, the tool automatically generates it as a proper Shared Parameter behind the scenes and binds it directly to the Floors category! Use the
+and-controls to curate your custom matrix.
- Automated Shared Parameter Creation: If a custom parameter name doesn’t currently exist in your project, the tool automatically generates it as a proper Shared Parameter behind the scenes and binds it directly to the Floors category! Use the
4. Action Bar Commands
Section titled “4. Action Bar Commands”- Select Rooms: Activates continuous viewport selection mode. You can seamlessly click through dozens of project rooms one after another without re-triggering the ribbon command!
- Real-Time Status Monitor: The lower notification bar delivers real-time validation feedback, confirming exact room names and numbers as floors generate cleanly across your model.
💡 Architect’s Tips & Behavior Guide
Section titled “💡 Architect’s Tips & Behavior Guide”- True 3D Solid Door Sensing: Simple modeling scripts often rely on basic 2D bounding boxes or generic origin-point calculations (which routinely break when utilizing custom door families with offset origins). Smart Floor Finish extracts the real physical 3D Solid Geometry of intersecting door frames, leafs, and wall openings—guaranteeing flawless threshold depth alignments every single time.
- Curtain Wall Storefront Intelligence: Designing hospitality or commercial storefronts? The tool natively decodes Curtain Wall assemblies by parsing structural aluminum mullion grids from decorative glass door inserts, generating pristine threshold tolerances even if door families are modeled in an “open” 3D display state!
- Complete 3D Viewport Freedom: You are never restricted to flat, traditional 2D floor plans! Run Smart Floor Finish directly while orbiting in a live 3D view—simply click any exposed wall or floor surface. The algorithm mathematically ray-casts into the surrounding space, identifies the enclosing Room volume, and deploys the finish floor instantly.
- Intelligent Context-Aware Replacement: As design revisions unfold, you never have to waste time manually hunting down and deleting legacy floor slabs. Simply choose your updated material settings and re-click the target room: the engine identifies the old Smart Floor Finish, cleanly removes it, and installs the updated assembly without generating duplicate overlapping element warnings!
- Automated Island & Shaft Subtraction: The boundary calculation doesn’t just trace basic outer perimeters; it identifies free-standing structural columns, mechanical shafts, and internal pipe chases situated within the room, cleanly subtracting their exact geometric footprints out of your finished floor profile!