
Smart Slice
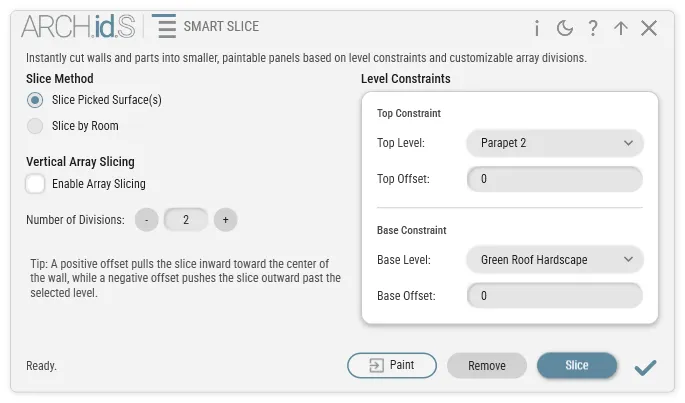
Overview
Section titled “Overview”The Smart Slice tool harnesses Revit’s powerful native “Parts” engine to cleanly subdivide architectural walls and columns into segregated, independently paintable regions. It is the ultimate detailing instrument for interior architects designing tile dados, acoustic wainscot paneling, two-tone paint banding, or exterior structural facade color zoning.
Crucially, Smart Slice provides a completely non-destructive workflow. Actually splitting physical Revit wall families to apply localized materials is notorious for creating architectural chaos—destroying structural wall joins, disrupting acoustic wall type tags, and corrupting structural engineering links! Smart Slice protects your core model by deploying an isolated, surface-level “Part” skin over your walls. Operating as the perfect companion to Smart Paint, it automatically strips away Revit’s tedious parameter locks, leaving newly created surface zones instantly ready to receive custom architectural finishes.
Interface Breakdown
Section titled “Interface Breakdown”1. Slicing Scope Modes
Section titled “1. Slicing Scope Modes”Determine the operational scale of your surface subdivision command:
- Room Mode (Whole-Room Dado Banding): Click directly inside any Revit Room: the spatial engine detects every enclosing wall boundary and slices uniform horizontal or vertical dividing lines across the entire perimeter simultaneously!
- Face Mode (Surgical Target Selection): Click individual architectural walls, standalone structural columns, or existing surface parts to perform localized, high-precision surface subdivisions.
2. Horizontal Slicing Controls
Section titled “2. Horizontal Slicing Controls”Establish precise structural datum elevations to project clean horizontal trim lines across your target surfaces:
- Bottom Level & Offset: Define your initial floor datum baseline and vertical offset starting height (e.g.,
"Level 1 + 0mm"). - Top Level & Offset: Establish your upper slicing termination datum (e.g.,
"Level 1 + 1200mm"to instantiate a classic interior tile dado or acoustic timber wainscot elevation).- Automated Geometry Evaluation: The engine evaluates wall heights, door penetrations, and structural geometry automatically, scribing crisp horizontal separation boundaries exactly between your designated elevations without cutting door frames!
3. Vertical Subdivision Engine
Section titled “3. Vertical Subdivision Engine”- Enable Vertical Slicing: Activate this option to divide horizontal wall bands into rhythmic vertical decorative panels or modular grid sections.
- Divisions (Panel Counts): Specify the desired quantity of equal vertical surface sections to generate evenly across the linear span of your target wall or column face.
4. Action Bar & Smart Paint Integration
Section titled “4. Action Bar & Smart Paint Integration”- Slice: Launches active viewport selection mode to pick architectural targets and execute your surface divisions.
- Remove (Merge & Restore): Changed your design intent or made an accidental cut? Activate Remove mode and click any previously subdivided parts: the engine instantly dissolves the separation boundaries and merges everything back into a unified, clean original wall surface!
- Paint (Quick-Switch to Smart Paint): A dedicated workflow bridge. Once your wall regions and decorative panel grids are cleanly sliced, hit this button to close Smart Slice and instantly pull up the Smart Paint palette to begin applying color tones and materials to your newly formed zones.
💡 Architect’s Tips & Behavior Guide
Section titled “💡 Architect’s Tips & Behavior Guide”- The Auto-Unlock Innovation: A universal frustration when working with native Revit Parts is being forced to manually open properties and uncheck the
"Material by Original"lock box for every single isolated part before the software allows you to paint it. Smart Slice eliminates this bottleneck completely. The instant a surface slice is instantiated, our engine automatically disables parameter locking behind the scenes—prepping your panels for immediate painting! - Zero Damage to Structural BIM Models: Because Smart Slice overlays surface geometry exclusively within Revit’s native Parts architecture, your core architectural walls, fire ratings, room boundary acoustic properties, and structural IFC exports remain 100% untouched and safe. If you ever toggle View Properties from “Show Parts” back to “Show Originals”, your structural walls appear completely unified and uncut!
- Iterative Re-Slicing Power: You aren’t limited to a single pass! If you initially slice a wall horizontally to separate a lower 1200mm tile zone, you can select the remaining upper wall part and run Smart Slice again to introduce vertical acoustic accent paneling along the upper wall elevations.
- Concrete & Structural Column Styling: Smart Slice explicitly supports both Architectural and Structural Columns in its selection filter. This workflow is a game-changer for commercial parking structures and industrial facilities—allowing you to slice the lower 500mm of raw concrete support columns and switch directly to Smart Paint to coat them in safety-yellow hazard paint!